DNS Practical: Mastering the ‘dig’ Command
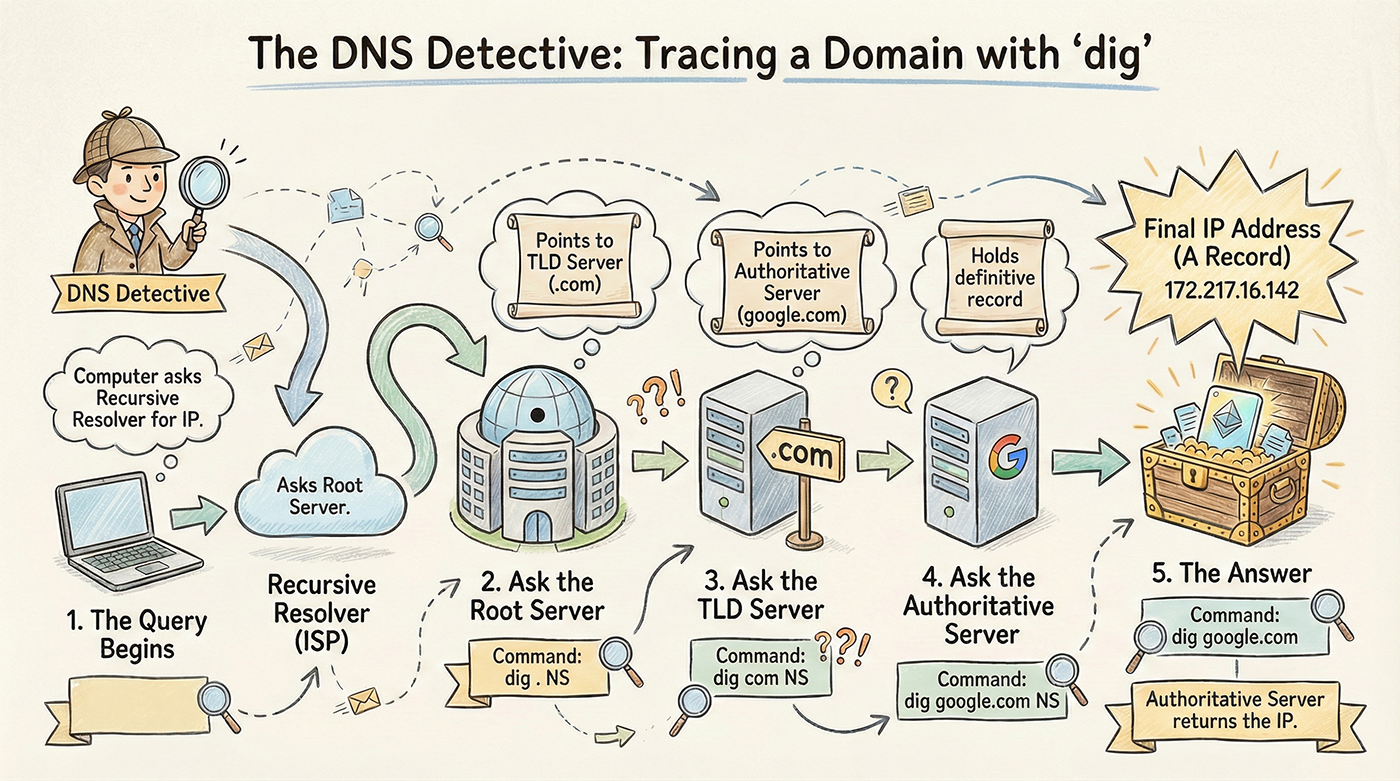
In our previous blog, we discussed the DNS, its components, and different types of records. In this post, we will take one step further and see how DNS resolution actually happens in practice.
When you type a URL into a browser and press Enter, you are taken to the website almost instantly. The browser receives an IP address and connects to the destination, but the series of DNS lookups that lead to the final IP address usually remains hidden.
In this post, we will uncover those hidden steps using the ‘dig’ command and observe the DNS resolution journey from the terminal.
The ‘dig’ command will let us see the journey of our URL to IP address from each step of DNS resolution, from root servers all the way to Google’s authoritative name servers.
What is DNS?
DNS stands for the Domain Name System. Its work is to translate the human friendly URL to the computers friendly IP address. A computer communicates using numerical addresses and remembering address for human its very hard task. DNS solves this problem by allowing humans to interact with the internet using names instead of numbers.
A common way of thinking about the DNS is as the Internet’s phonebook. Just like we save a phone number using the name of the person in our contacts. So, when we need to look for that saved number, we search the name, and the number show up automatically. DNS decouples a domain name from its underlying IP address, which means the IP address behind the name can change for many reasons without affecting the user. As long as the domain name remains the same, the user can continue accessing the website without noticing these changes. To see how this translation happens behind the scenes, we need a way to observe DNS resolution directly.
‘dig’ Command
dig stands for Domain Information Groper. It’s a powerful command-line tool used by developers to check the DNS records.
This command directly talks to the DNS server and returns the technical details hidden behind your domain (google.com).
If follows the exact DNS resolution steps as the browser, but this one exposes each step that was hidden from the user in browsers.
Usage:
When you want to check which IP address a website is pointing to. (A Record).
Diagnose Mail server issue: If your mail is not delivering, then you can check whether the MX record is set up correctly.
Debugging DNS issues.
When you change your website server and now want to check if the new address is updated across the internet.
To learn DNS internals.
dig . NS Command
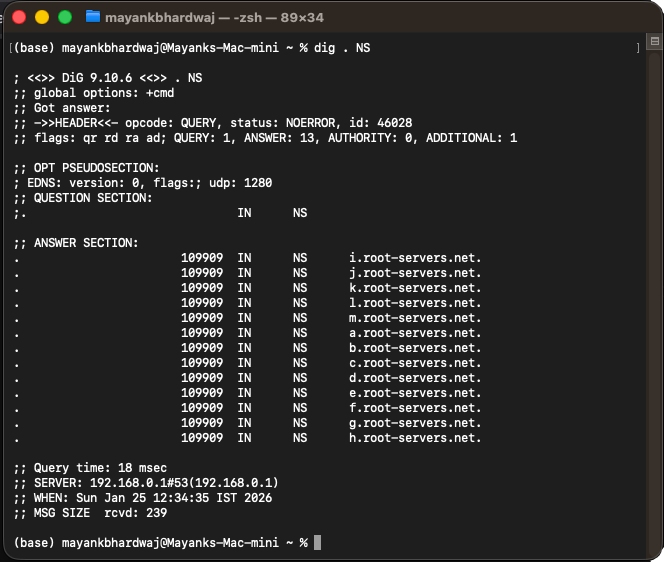
This command is used for checking the top-level of the DNS server, which is the Root Name Server.
Root servers don’t know the IP, but they know where TLDs live.
‘
. (Dot)’ in DNS world, the root is represented by the dot. When we write google.com the process removes the google.com.dot from the last. Its last dot remains hidden. It is the starting point of the DNS hierarchy.‘
NS’, this means Name Server. By writing it like this, we are asking the DNS who the Authoritative server is for this domain. In this case the domain is root.So overall this dig . NS command means tell me the Root Name Servers of the Internet.
There is a total of 13 logical Root Servers, named from a to m.
When you run this command in the terminal, you will see something like this:
In the output, you can see the list of 13 servers’ addresses. Even though these are just named 13 servers, but in reality, there are hundreds of servers present across the globe, so that one of them slows down the whole internet, don’t shut down.
dig com NS Command
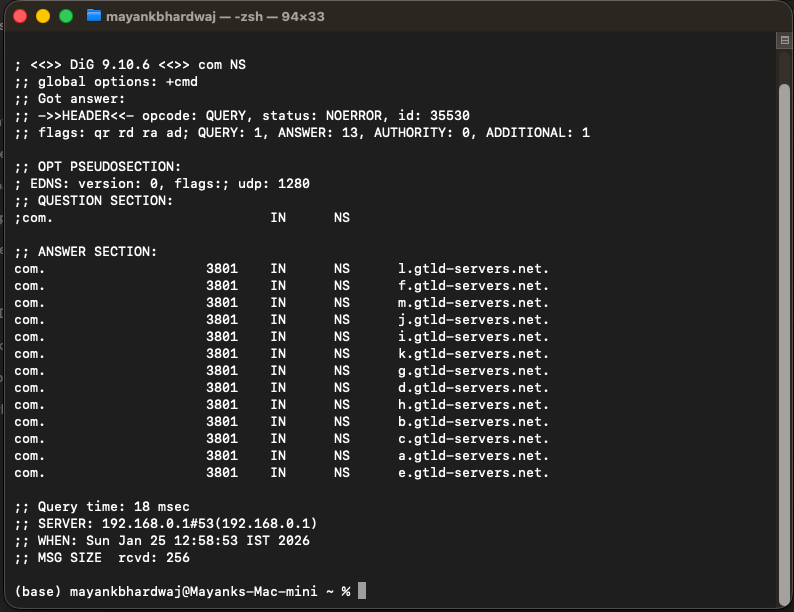
This command is used to find out the Top-Level Domain servers.
In the DNS tree, we have the root on the very top, and after that, we have the TLD, which knows where .com, .org, etc. are.
It lists the servers who controls the whole .com domain.
Here, by ‘
com’ we are asking specifically about the.comdomain. You can ask for any domain, e.g., .in, .org, etc.When you run this command, you will not see the root servers now, but you will see the gTLD servers.
If you observe the output of this command, you will be able to see the name has changed:
root-servers.nethas now been replaced bygtld-servers.net.These servers keep the index of all the
.comwebsites in the world.
dig google.com NS Command
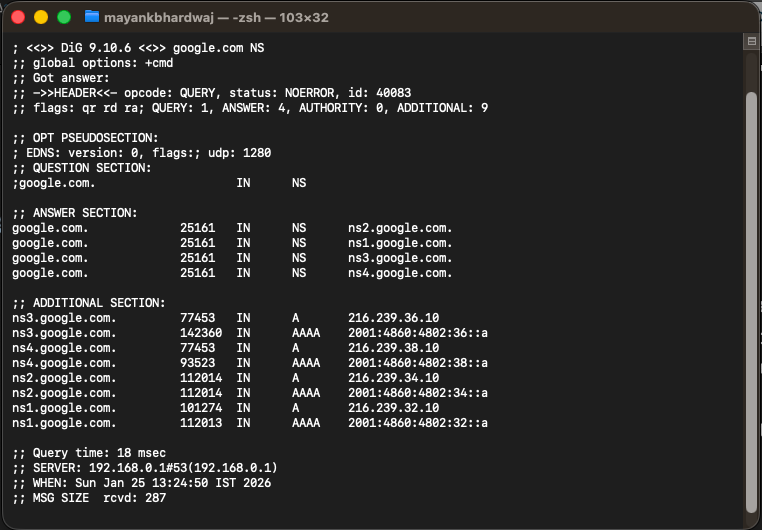
This command is used to find the Authoritative Name Server of a specific domain.
These are the servers that actually know where the website is hosted. They don’t direct you to some other servers, but they directly give you the IP address for the queried domain.
They are the source of truth. Until now, DNS was about finding the right server; this is where the answer lives.
‘
google.com’ is the specific domain for which you want the information.‘
NS’ tells us who has the responsibility for this specific domain?
dig google.com Command
We saw Root ( . ), TLD(.com), and an authoritative server separately. Now we will see what dig google.com do and how this whole system works together.
When you type this command in the terminal, you are saying that give me the result directly.
When you run this command, you will see something like this:
Here, A is the record type and the IP address that your browser will connect with to load the website.
Full DNS Resolution Flow
Recursive Resolver:
Your computer first asks your ISP (Internet Service Provider) or Google DNS (8.8.8.8): Do you know the address of google.com?
If the ISP has the address in its cache (memory), it provides it from there. If not, it acts as an agent and forwards the request.
Root Server:
Now the ISP’s agent will go to the root server and ask where google.com is.
Root doesn’t give the IP, but it replies with the address of the .com domain manager.
TLD Server:
Now the agent ask where is google.com form TLD server.
Even TLD doesn’t know the IP of the google.com, it replies with Google’s Authoritative server.
Authoritative Server (Google):
- This finally replies with the IP address of Google.com.
If you want to see this entire process live on your terminal, you will need to use the +trace option.
dig google.com +trace
This command will print all the steps we discussed above on the screen:
First, the list of Root Servers (.) will appear.
Then, the list of .com servers will appear.
Then, Google's Name Servers will be displayed.
And finally, the IP address will be shown.


